Products
Solutions
Resources
9977 N 90th Street, Suite 250 Scottsdale, AZ 85258 | 1-800-637-7496
© 2024 InEight, Inc. All Rights Reserved | Privacy Statement | Terms of Service | Cookie Policy | Do not sell/share my information

You can claim individual schedule items or multiple schedule items from the Schedule of values page. Claiming in Contract lets you track claims that might not be tied directly to work performed daily in the field.
You can view claim history of an item from the Contract claim history tab of the Edit schedule item slide-out panel (Edit > Contract claim history).
Schedule items must be claimed within the Valid from and Valid through date range defined in the schedule item details. If the claimed date falls outside of this date range, the schedule item cannot be claimed. An error message shows with the Claimed date or Posting date field if the entered date is invalid. If only a valid from date is specified, an error shows when the claimed date is earlier than that date. If only a valid through date is specified, an error shows when the posting date is later than that date.
You can claim a schedule item from the Edit schedule item slide-out panel.
The schedule item Hide in plan and progress check box must be set to Yes. After an item has been claimed, the value of the Hide in plan and progress field cannot be changed.
Select a schedule item, and then click the Edit schedule icon. The Edit Schedule item slide-out panel opens.
Go to the Contract claim tab.
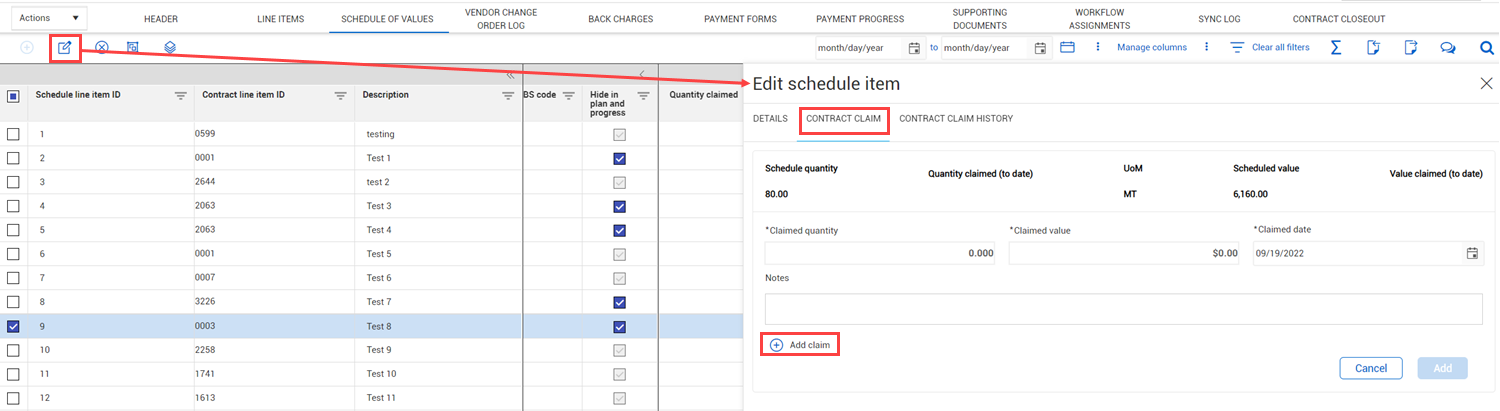
Enter the claimed quantity or claimed value. The other value is automatically calculated. A prompt asks if you want to recalculate the other field based on the entered value.
If you choose to recalculate, the other value is calculated.
If you choose not to recalculate, you can enter a value, including values that are rounded. The values might not match mathematically.
When you make a claim against a value-only schedule of values item, you can only claim value. The ability to claim quantity is disabled and cannot be recalculated.
Enter the claimed date and any notes.
If you want to claim additional items, click the Add claim icon in the slide-out panel, and repeat steps 2-5 as needed.
Click Add.
The Quantity claimed and Value claimed columns in the Contract section of the register are updated. All columns in the Summary progress section are updated.
You can claim multiple schedule items at one time from the Schedule of values register.
The schedule item Hide in plan and progress check box must be set to Yes. After an item has been claimed, the value of the Hide in plan and progress field cannot be changed.
From the Schedule of values register, click the Claim multiple schedule items icon. The Claim multiple schedule items dialog box opens.
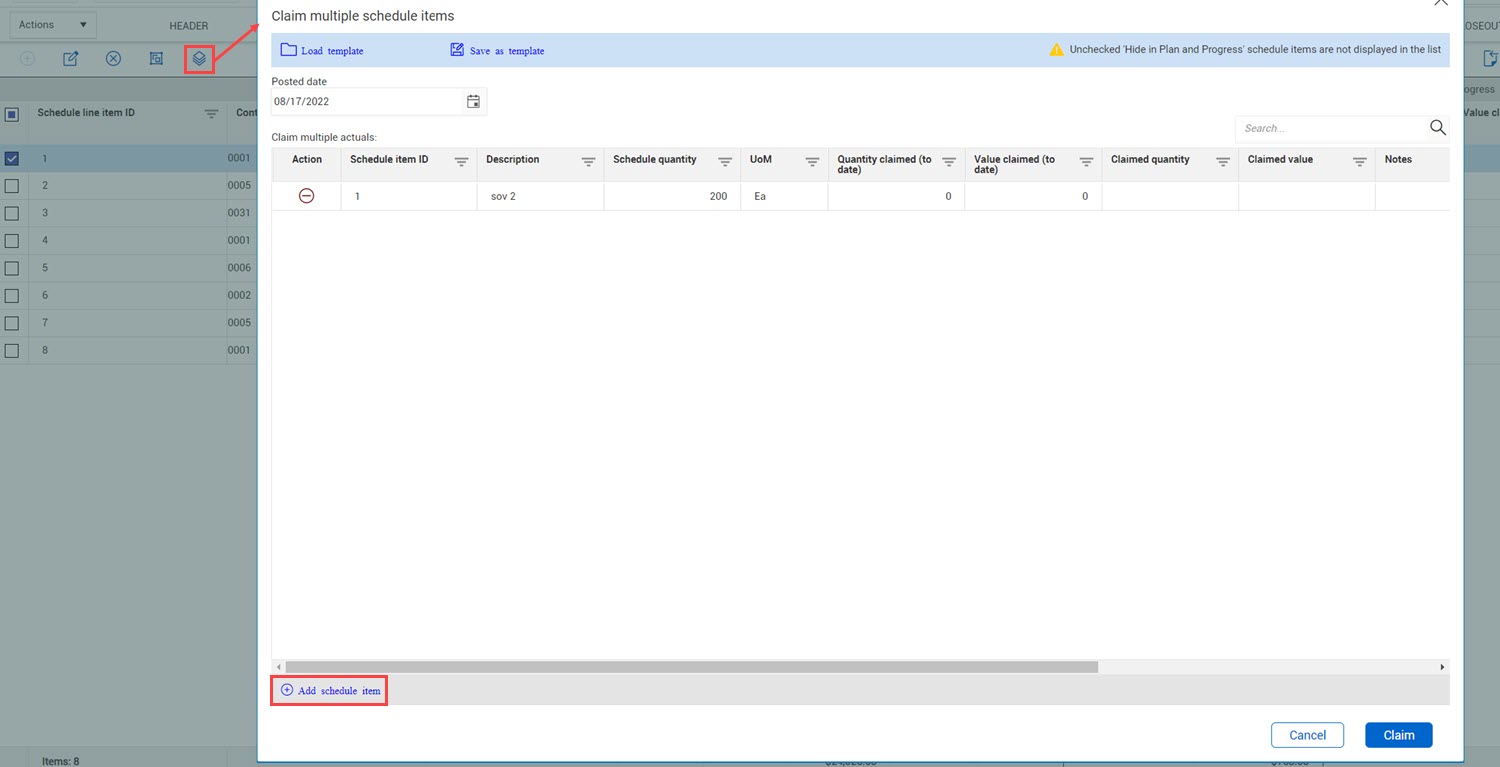
Enter the claimed quantity or value for each item. The other value is automatically calculated. A prompt asks if you want to recalculate the other field based on the entered value.
If you choose to recalculate, the other value is calculated.
If you choose not to recalculate, you can enter a value, including values that are rounded. The values might not match mathematically.
If you want to claim additional items, click Add schedule item. The Add schedule items dialog box opens.
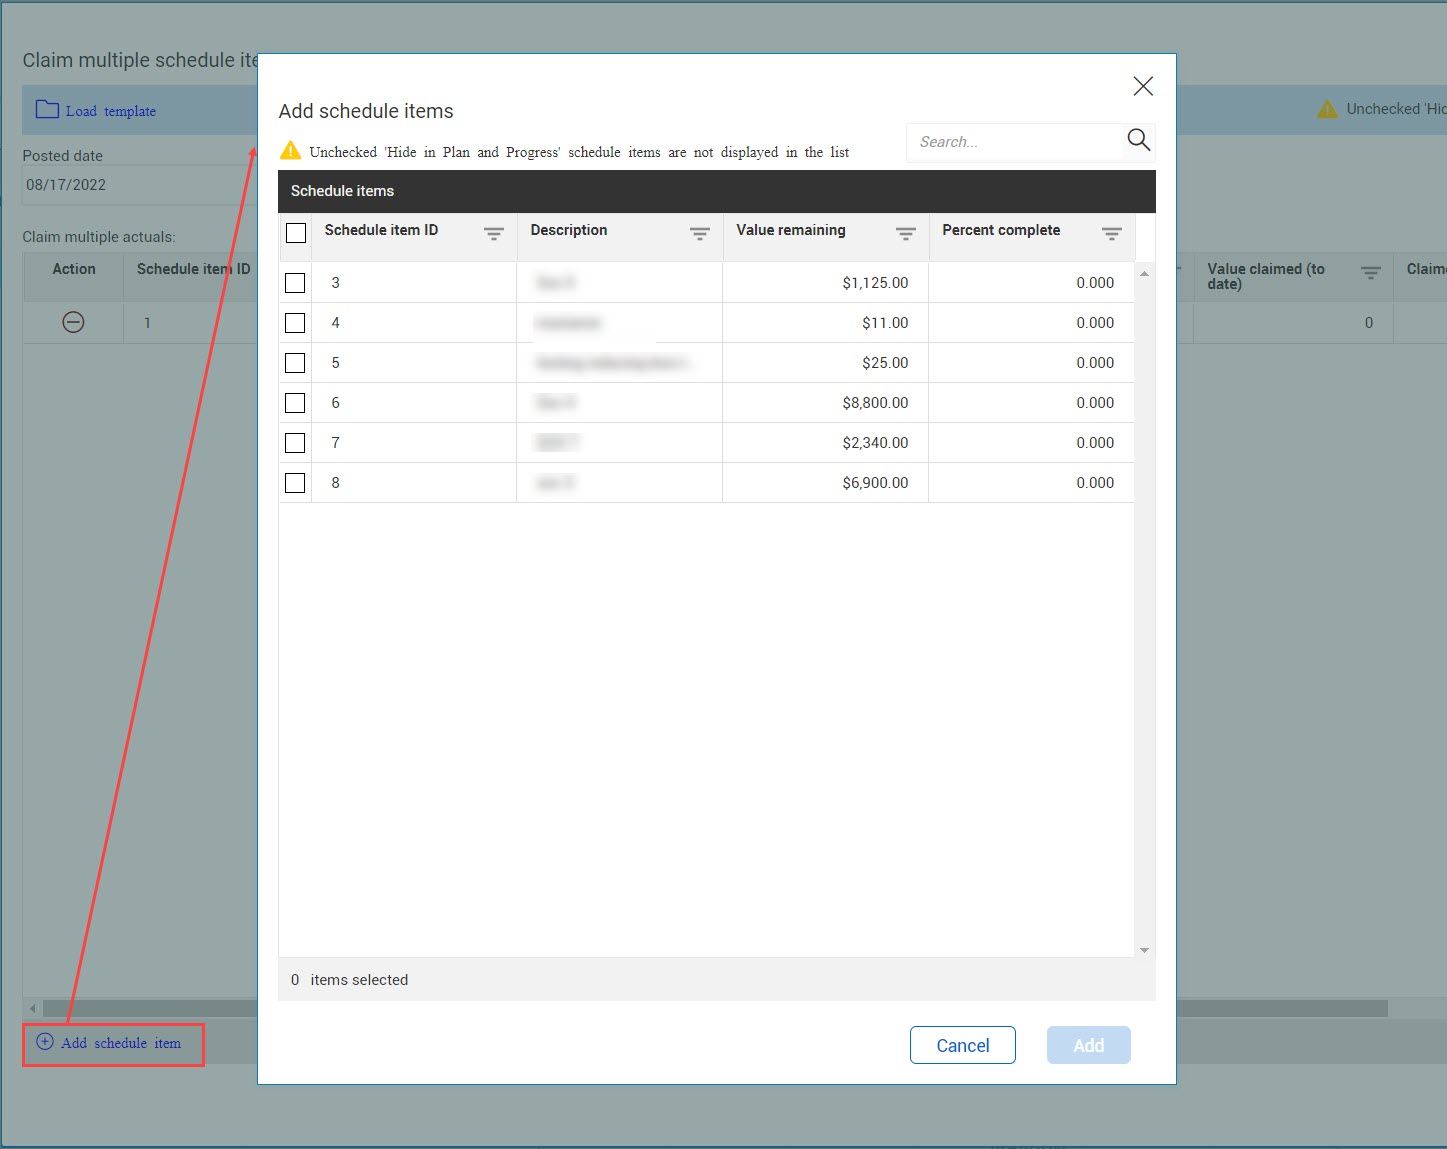
Select one or more schedule items, and then click Add. The items are added to the Claim multiple schedule items dialog box.
Enter the claimed quantities or values for the added items.
Click Claim.
The Quantity claimed and Value claimed columns in the Contract section of the register are updated. All columns in the Summary progress section are updated.
When you have many schedule items to claim at one time, you can use the import function to claim these items.
The schedule item Hide in plan and progress column of the spreadsheet must be set to Yes. Claims for schedule items with Hide in Plan and Progress set to No are ignored upon import. After an item has been claimed, the value of the Hide in plan and progress field cannot be changed.
On the Schedule of values tab, optionally select items to be exported.
If you select items, only those items selected are exported.
If you do not select any items, all items are exported.
Click the Export icon, and then select With data. A Microsoft Excel spreadsheet with the schedule items is downloaded.
Open the template, and then claim items in the Quantity claimed or Value claimed columns, and then save the file.
Click the Import icon. The Import data from template dialog box opens.
Browse for the file or drag and drop it to the dialog box.
Indicate whether to import values based on the quantity, value, or both. If you select Quantity, the Value claimed is recalculated regardless of what was entered and vice versa. If you select Quantity and Value, both columns are read regardless of whether they match. You are responsible for maintaining those fields.
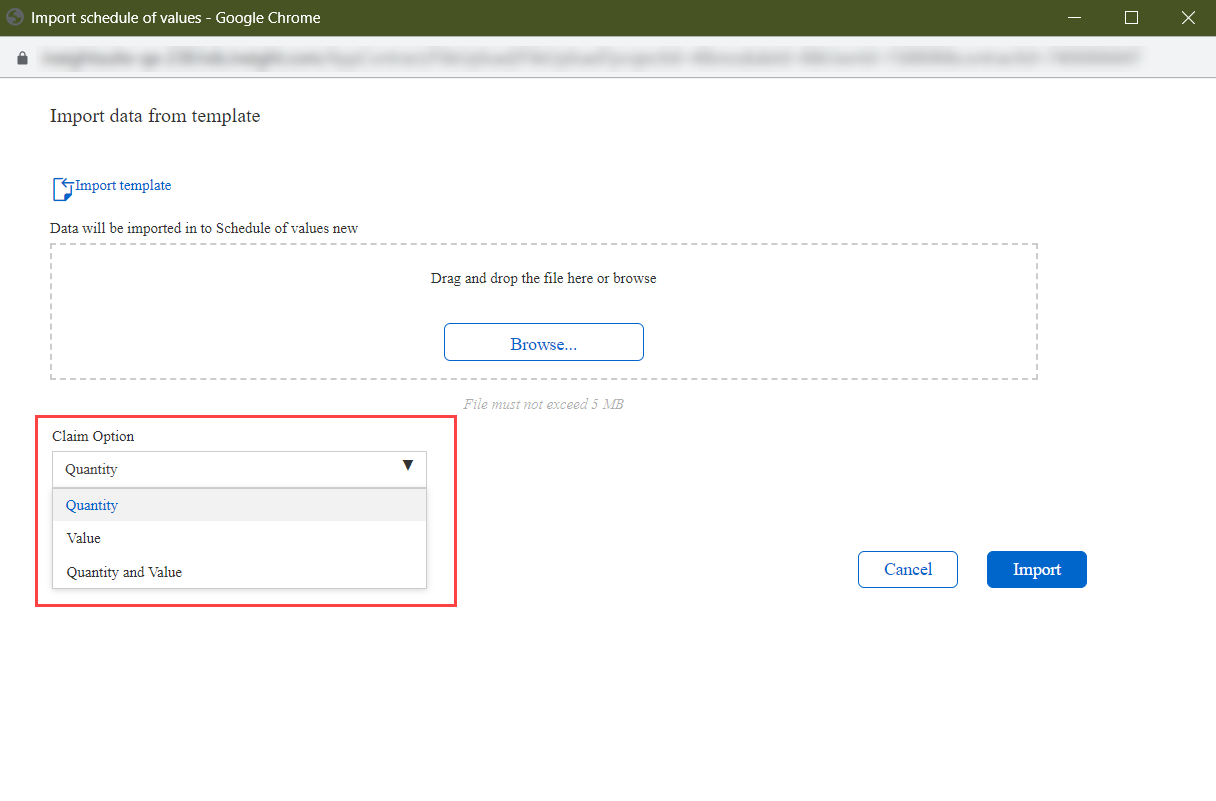
Click Import. Data is imported and the results are emailed when completed.
From the email notification, click Review data. The import history page opens, and you can review the import. The Schedule of values page is updated. The import history shows the import type used in the Schedule of values.
If you have many schedule items or if you have a group of claims that you use on a regular basis, such as at the end of the week or each time concrete is poured, you can create a claim template. The template can help you quickly find the schedule items you need each time the event occurs.
You can create a claiming template when you claim multiple schedule items.
From the Schedule of values register, select one or more schedule items, and then click the Claim multiple schedule items icon. The claim multiple schedule items dialog box opens.
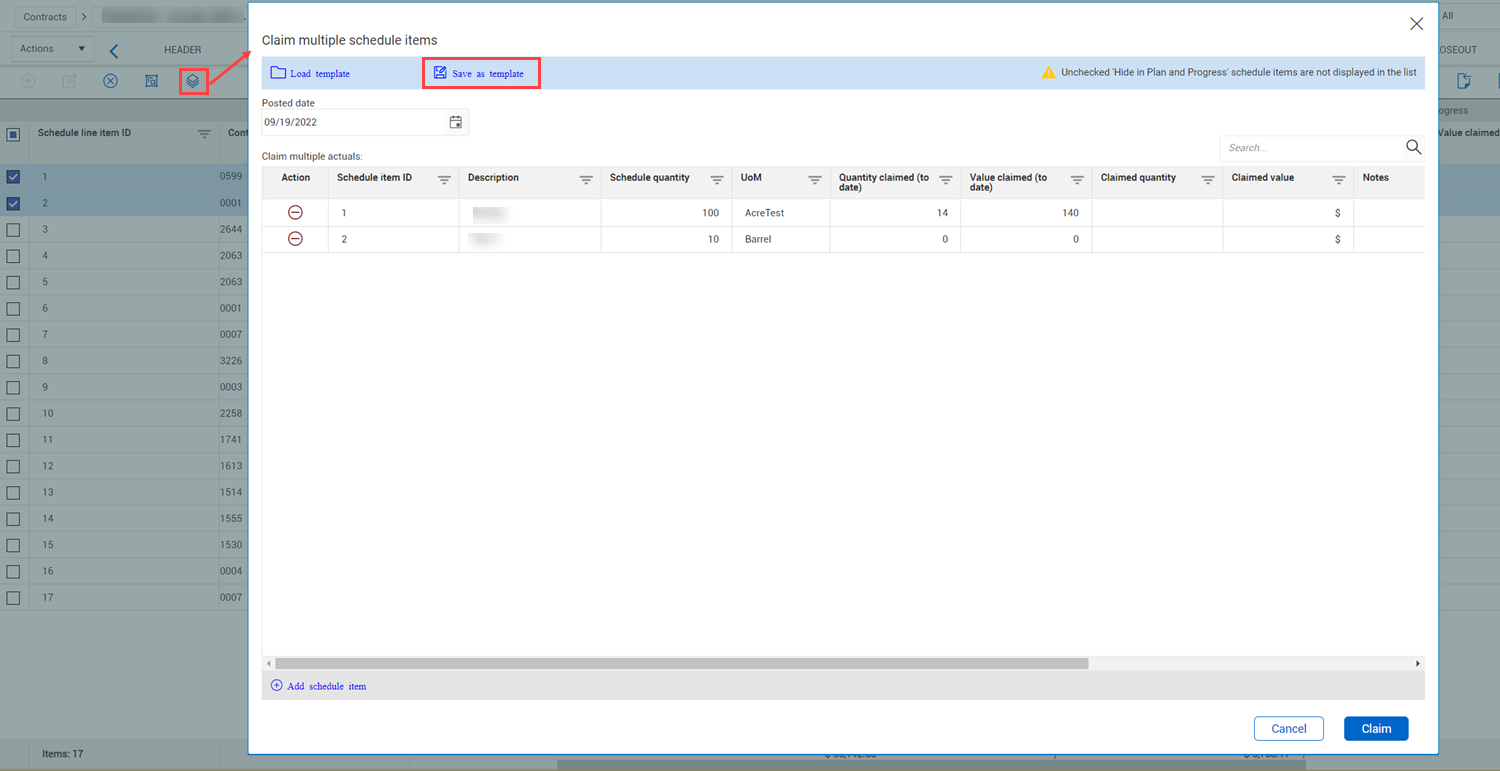
Add the schedule items for the template as you do when you Claim multiple schedule items, and then click Save as template. The Save template dialog box opens.
Enter the name of the template, and then click Save.
You can use the claiming template to make a claim from contract.
You can load an applicable template when you have a group of claims that are used regularly, so you do not have to search for each item.
A template must already be created.
From the Schedule of values register, select one or more schedule items, and then click the Claim multiple schedule items icon. The claim multiple schedule items dialog box opens.

Click Load template. The Load template dialog box opens.
Select the template you want to use, and then click Load. The template opens in the Claim multiple schedule items dialog box.
Review the template, and add or remove items as needed.
Enter the claimed quantities or values for the added items.
Click Claim.
Additional Information
9977 N 90th Street, Suite 250 Scottsdale, AZ 85258 | 1-800-637-7496
© 2024 InEight, Inc. All Rights Reserved | Privacy Statement | Terms of Service | Cookie Policy | Do not sell/share my information